Adventures in Devops
Publishing a simple HTML site to S3 and CloudFront using GitHub Actions
Publishing a simple HTML site to S3 and CloudFront using GitHub Actions
With the launch of my new blog, it was also time to update my regular, static wileydavis.com homepage.
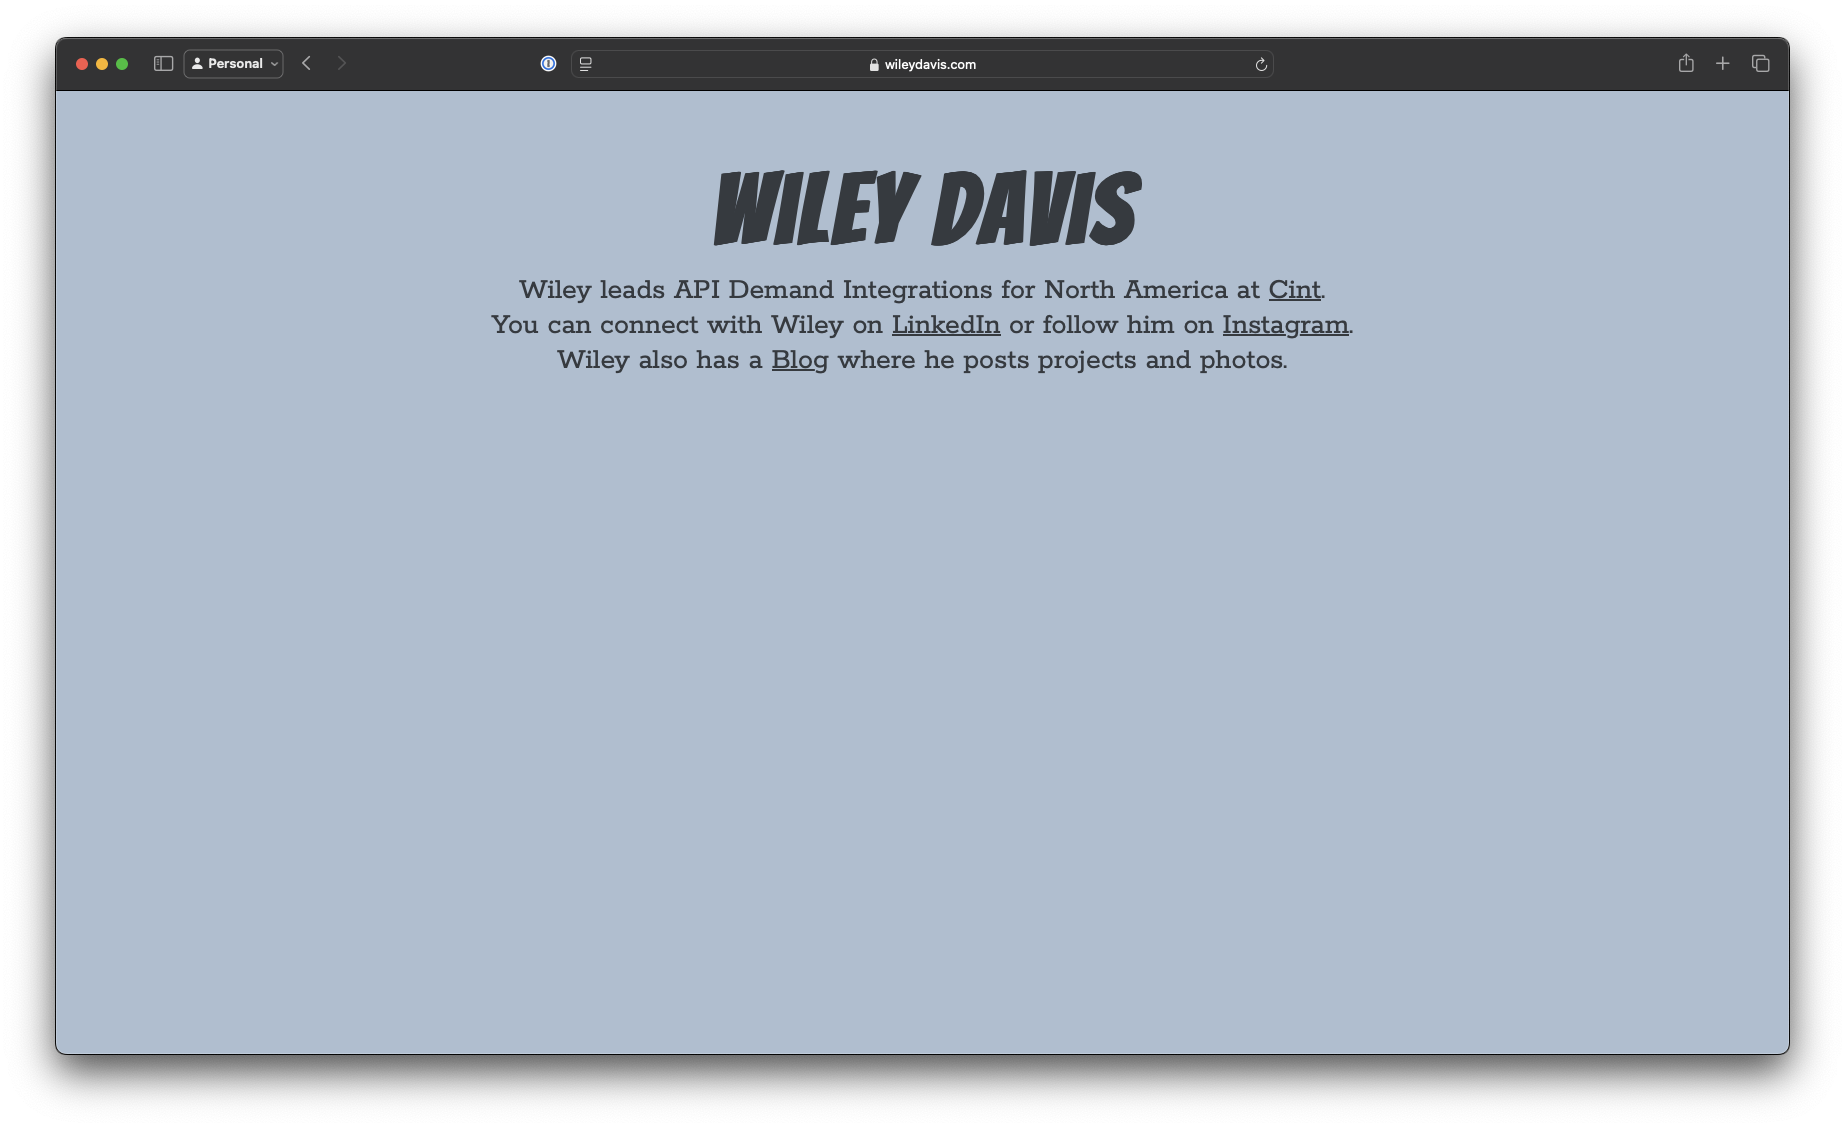
It's a simple HTML page with a little bit of handwritten CSS, some Google fonts, and an AWS CloudFront distribution. The page sources sit in a GitHub repo, and I've been manually copying them to the S3 bucket behind the CloudFront distribution.
If you're reading this, you probably already know how painful the AWS Admin Console is, and like me, are trying to do everything possible to avoid spending unnecessary time in it. So this seemed like a good time to see if I could automate the whole process using GitHub Actions.
How hard could it possibly be?
Getting Started in AWS
I actually started in GitHub, but now that I'm done, it makes more sense to skip all the reading and comparing references I did there - if you're following along step-by-step, it's a lot easier to start in AWS, then come back to GitHub once all the permissions and roles are set up.
I'm also assuming that you already have your website set up on S3 and CloudFront, and that you know which S3 bucket you're planning to access. If you're not already at that point, keep an eye out for a future guide on the basics of configuring S3 and CloudFront for static HTML.
IAM Policies and Roles
If you want GitHub to be able to do work for you in your AWS account, it's going to need permissions.
AWS IAM (Identity and Access Management) offers extensive, fine-grained (read: overcomplicated) tools to precisely control exactly what resources and actions are allowed within your account. I'll admit that I'm not an expert - most of what I did here made sense and looks correct, but you'd do well to review your use case and account permissions against my approach.
When I started working on this project, I wasn't sure exactly which IAM object was going to offer access into the account. On previous projects like this, I've used IAM users with persistent ID and Secret credentials, but Amazon likes to provide big, flashy warnings that this is a Bad Idea.
But whatever I chose, I was going to need a Policy to manage access.
After logging into the AWS Console, I navigated to IAM, then Policies, and started creating a new policy. I selected "S3" from the dropdown, and was confronted with a dizzying array of options.
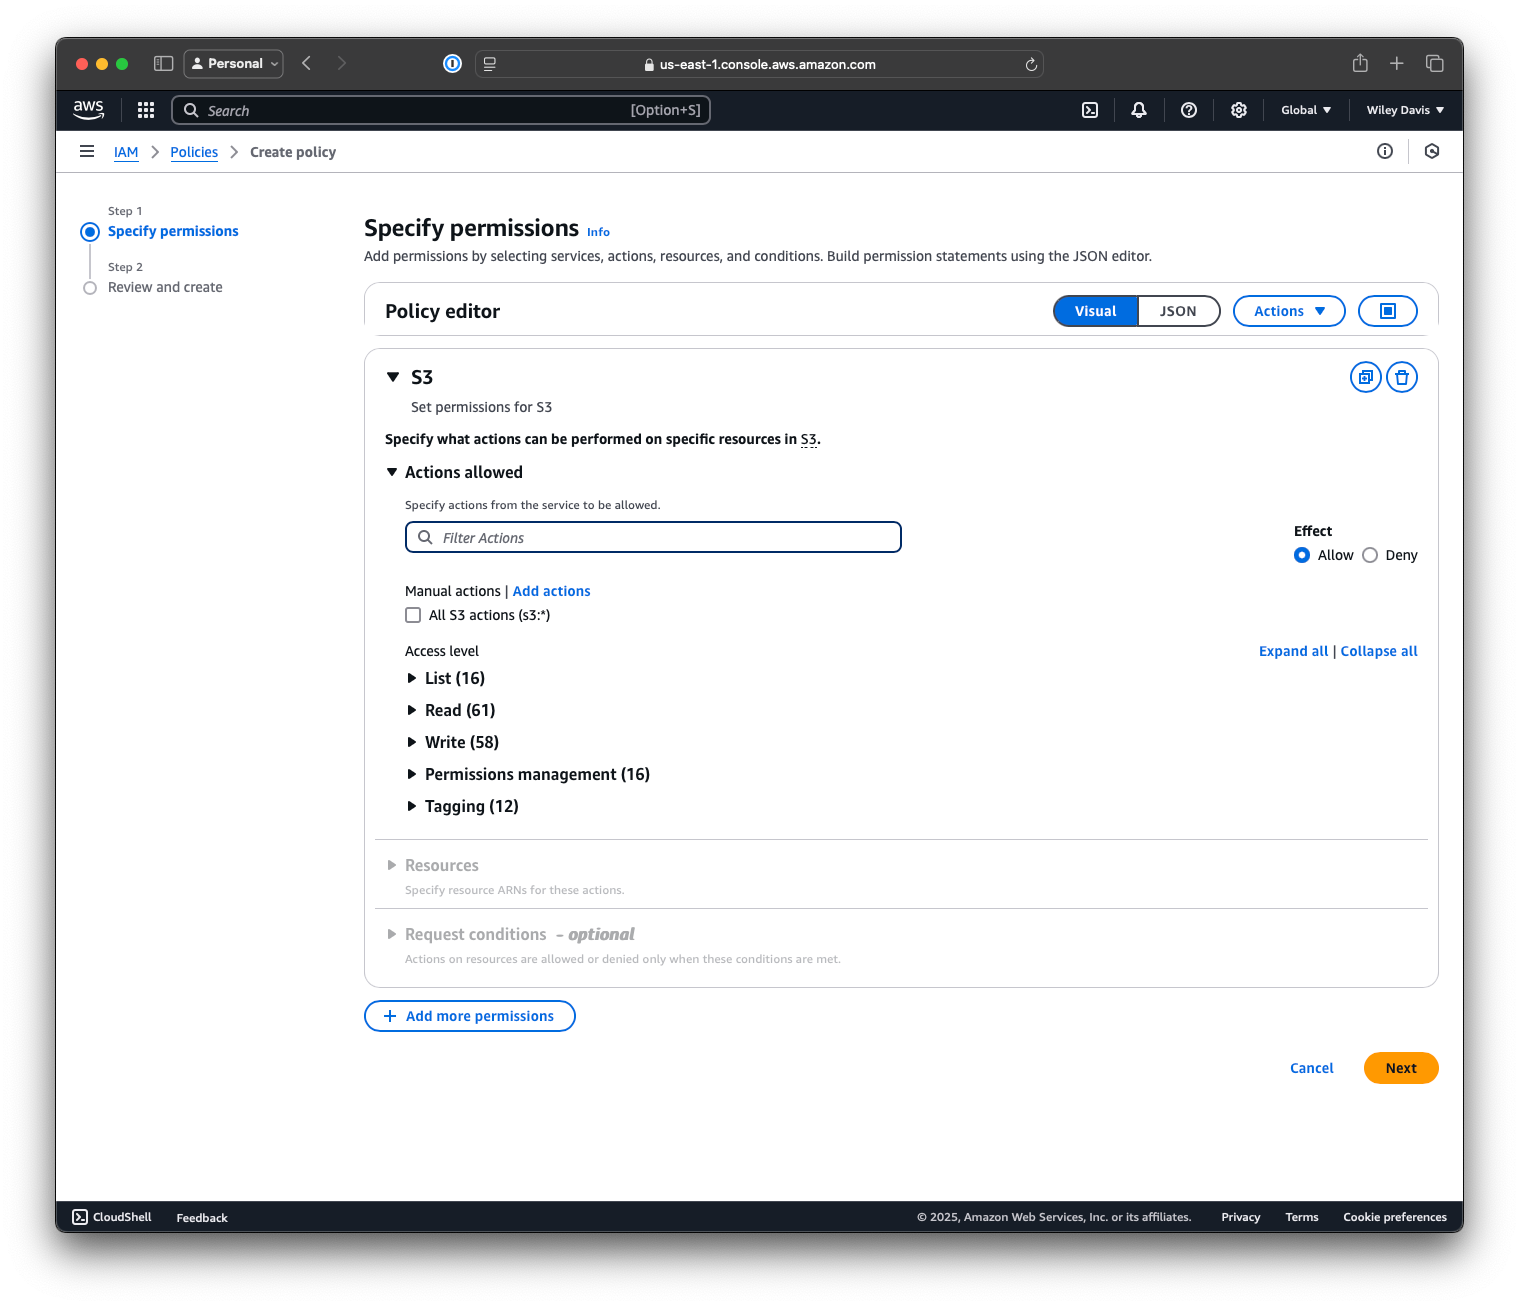
Since I barely trust myself here, much less GitHub, I wanted to come up with a relatively minimal set of permissions, mostly focused on the ability to read and write to the bucket.
I kept most of the list permissions, since we'll potentially need them for the AWS CLI to work, as well as most of the read permissions. I limited write fairly heavily to only allow creation, updating, and deleting of objects in the bucket.
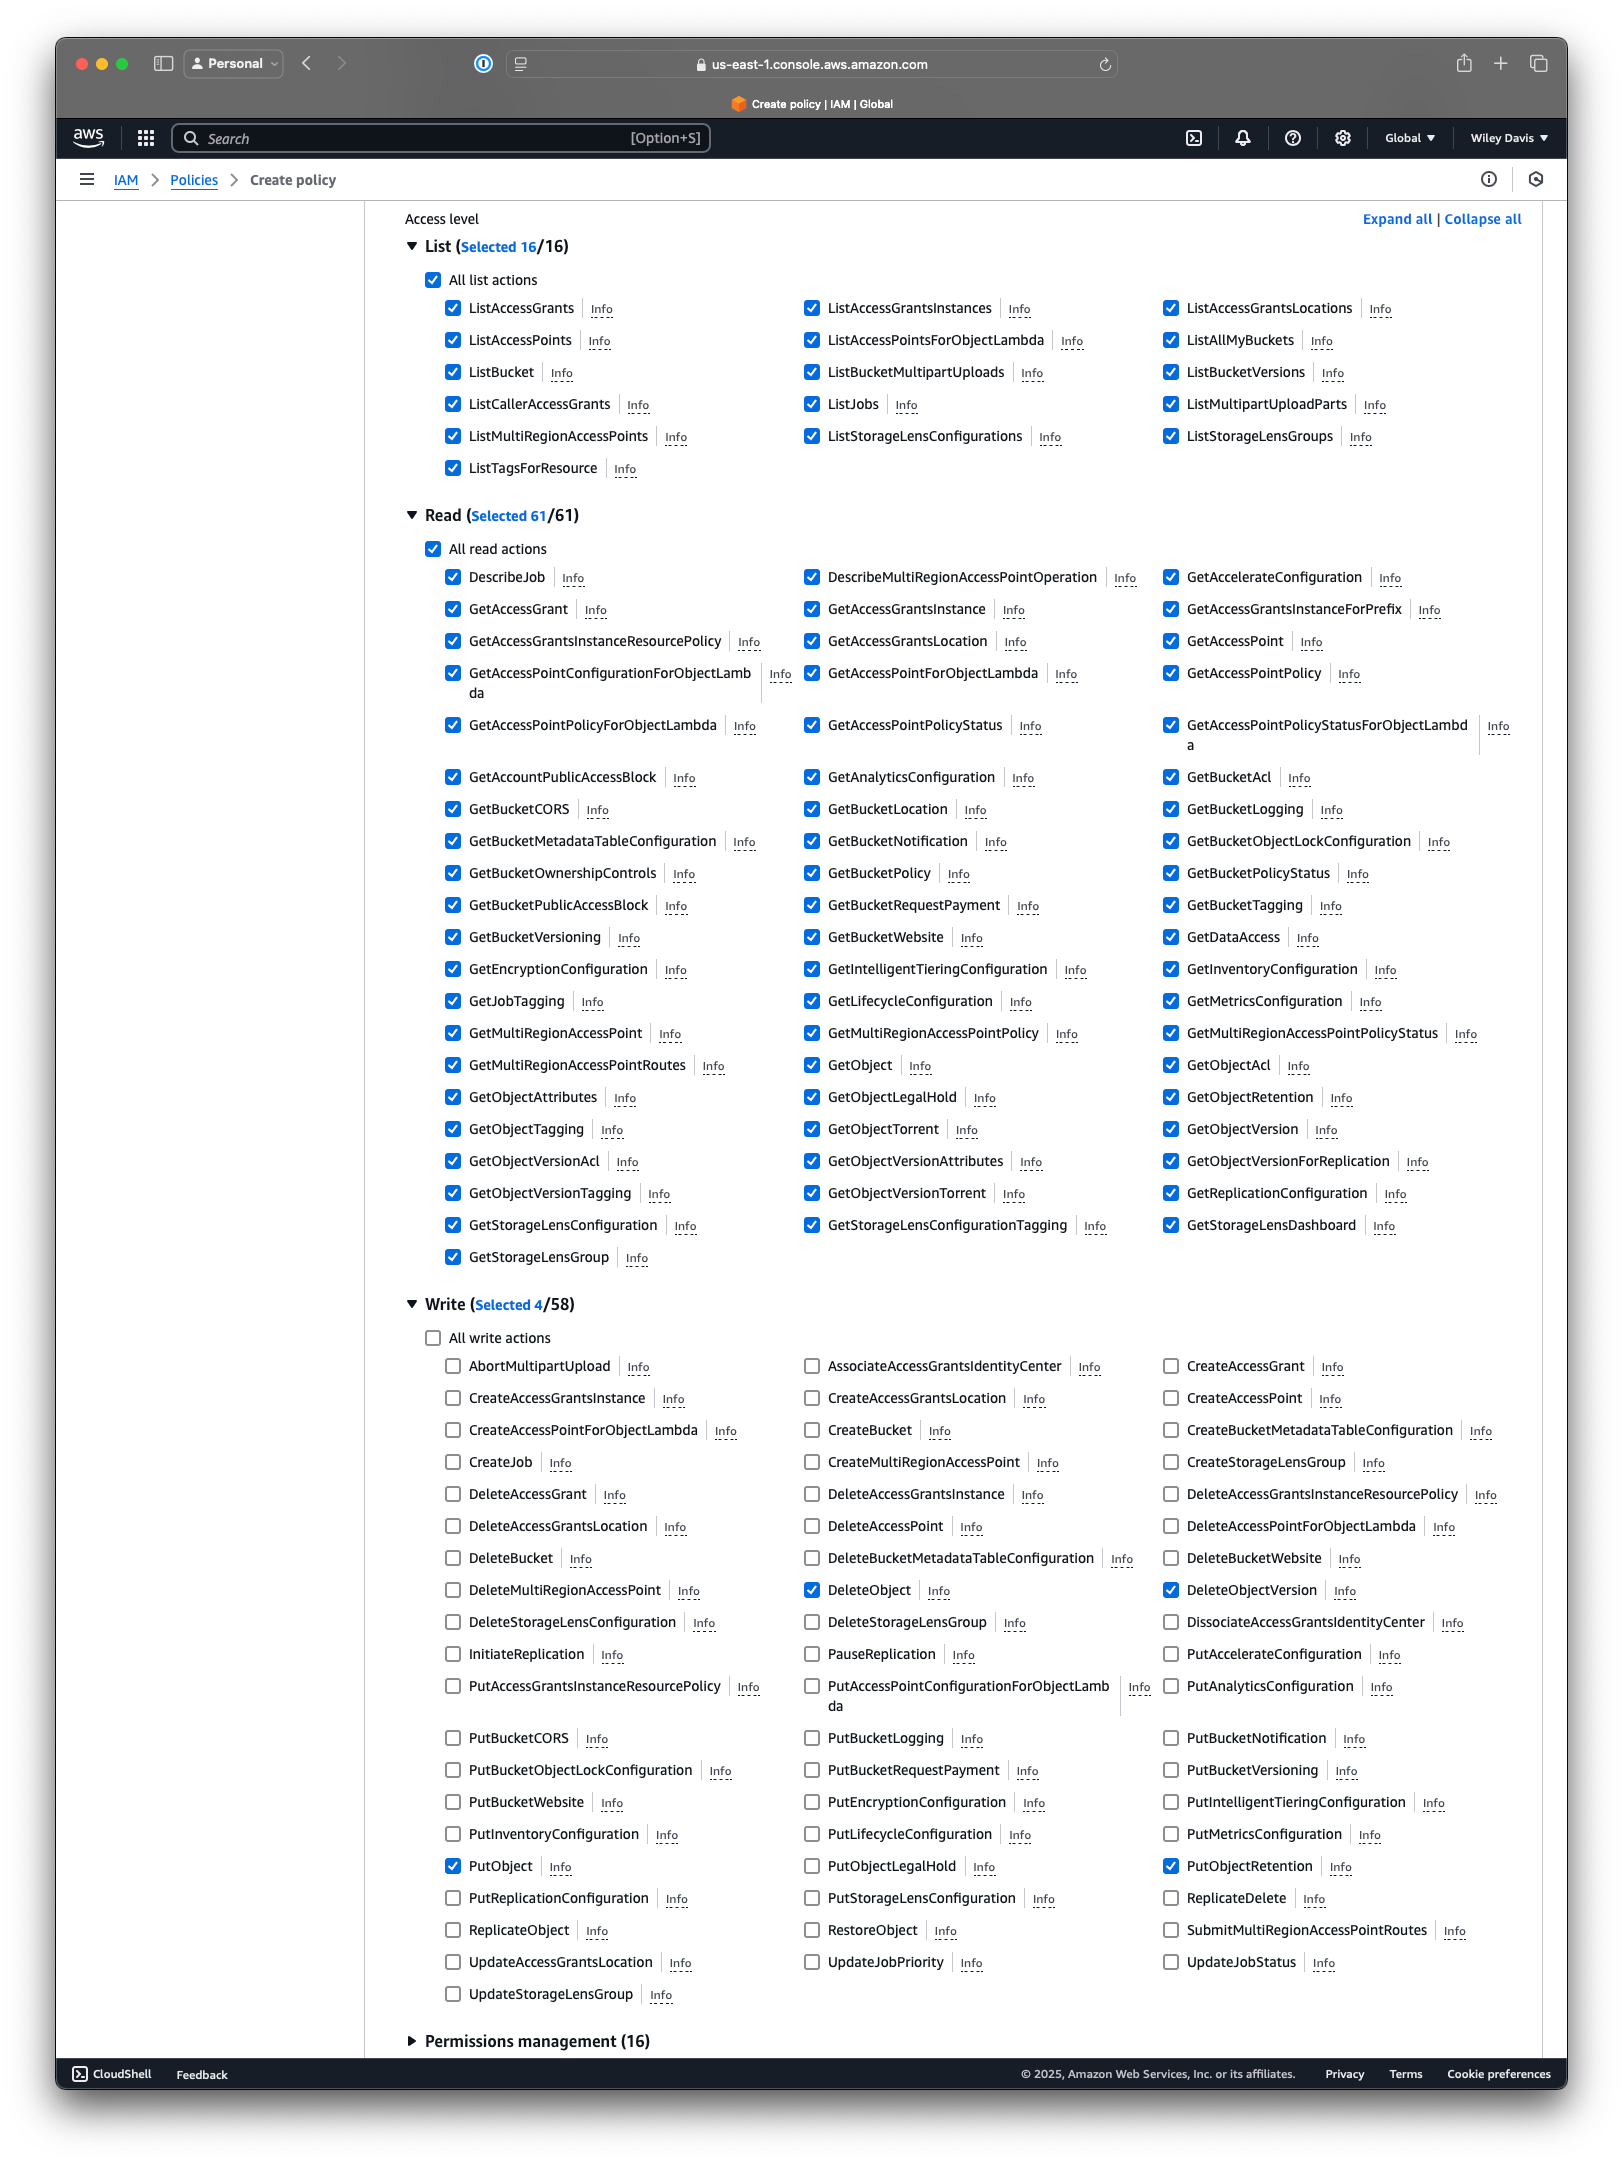
I also applied the policy so that it allows access only to a single bucket. If you want a shortcut, you can use the JSON here, editing the account number and bucket name to match yours.
Whatever you set here, make sure you note the policy name - you'll need it later.
Configuring the GitHub Identity Provider
Remember how I said that Users and client credentials were a bad idea? You're probably asking what to do instead, and the answer is to leverage GitHub's OpenID Connect (OIDC) connector to AWS.
This service provides a standard way for GitHub to request permissions in your AWS account, scoped to organizations and repos you control, which last just long enough to handle deployment.
First, I added the GitHub OIDC service as an Identity Provider in IAM. GitHub describes the process here, including the necessary settings, which look like this in AWS:
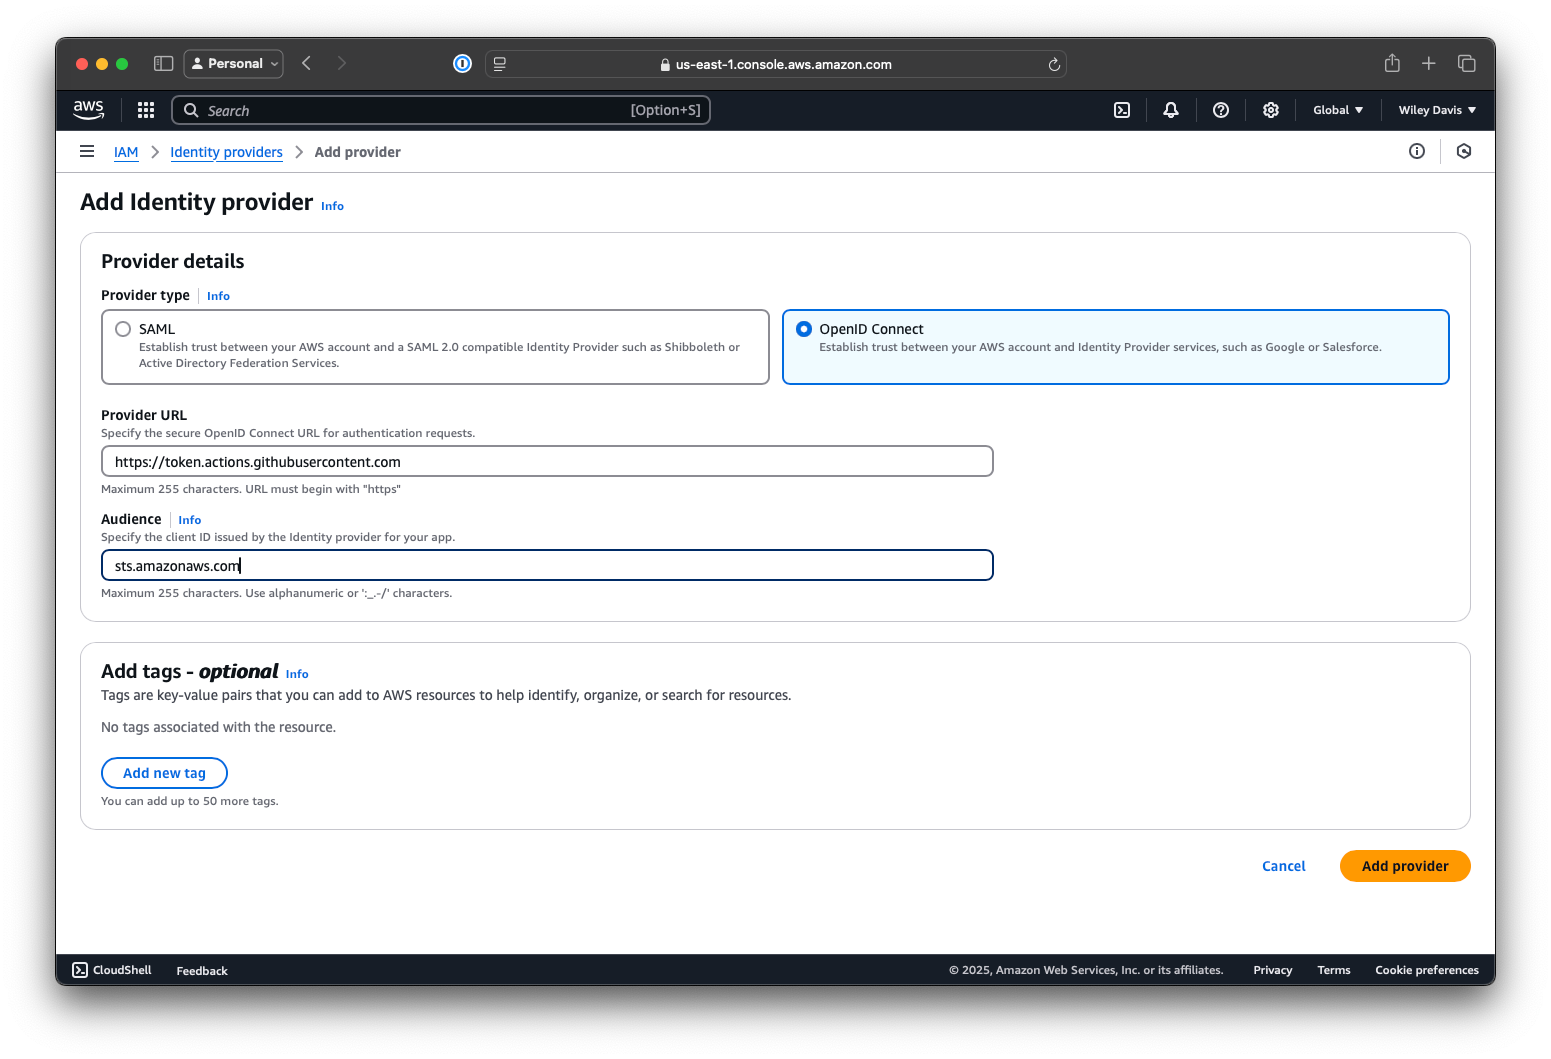
Since I'm using the official action (more on this later), I kept the recommended sts.amazonaws.com value.
Next, I created a Role to allow GitHub to use the Policy I created. The docs from both AWS and GitHub make this seem fairly complex, but the actual AWS wizard makes it relatively straightforward for my simple use case.
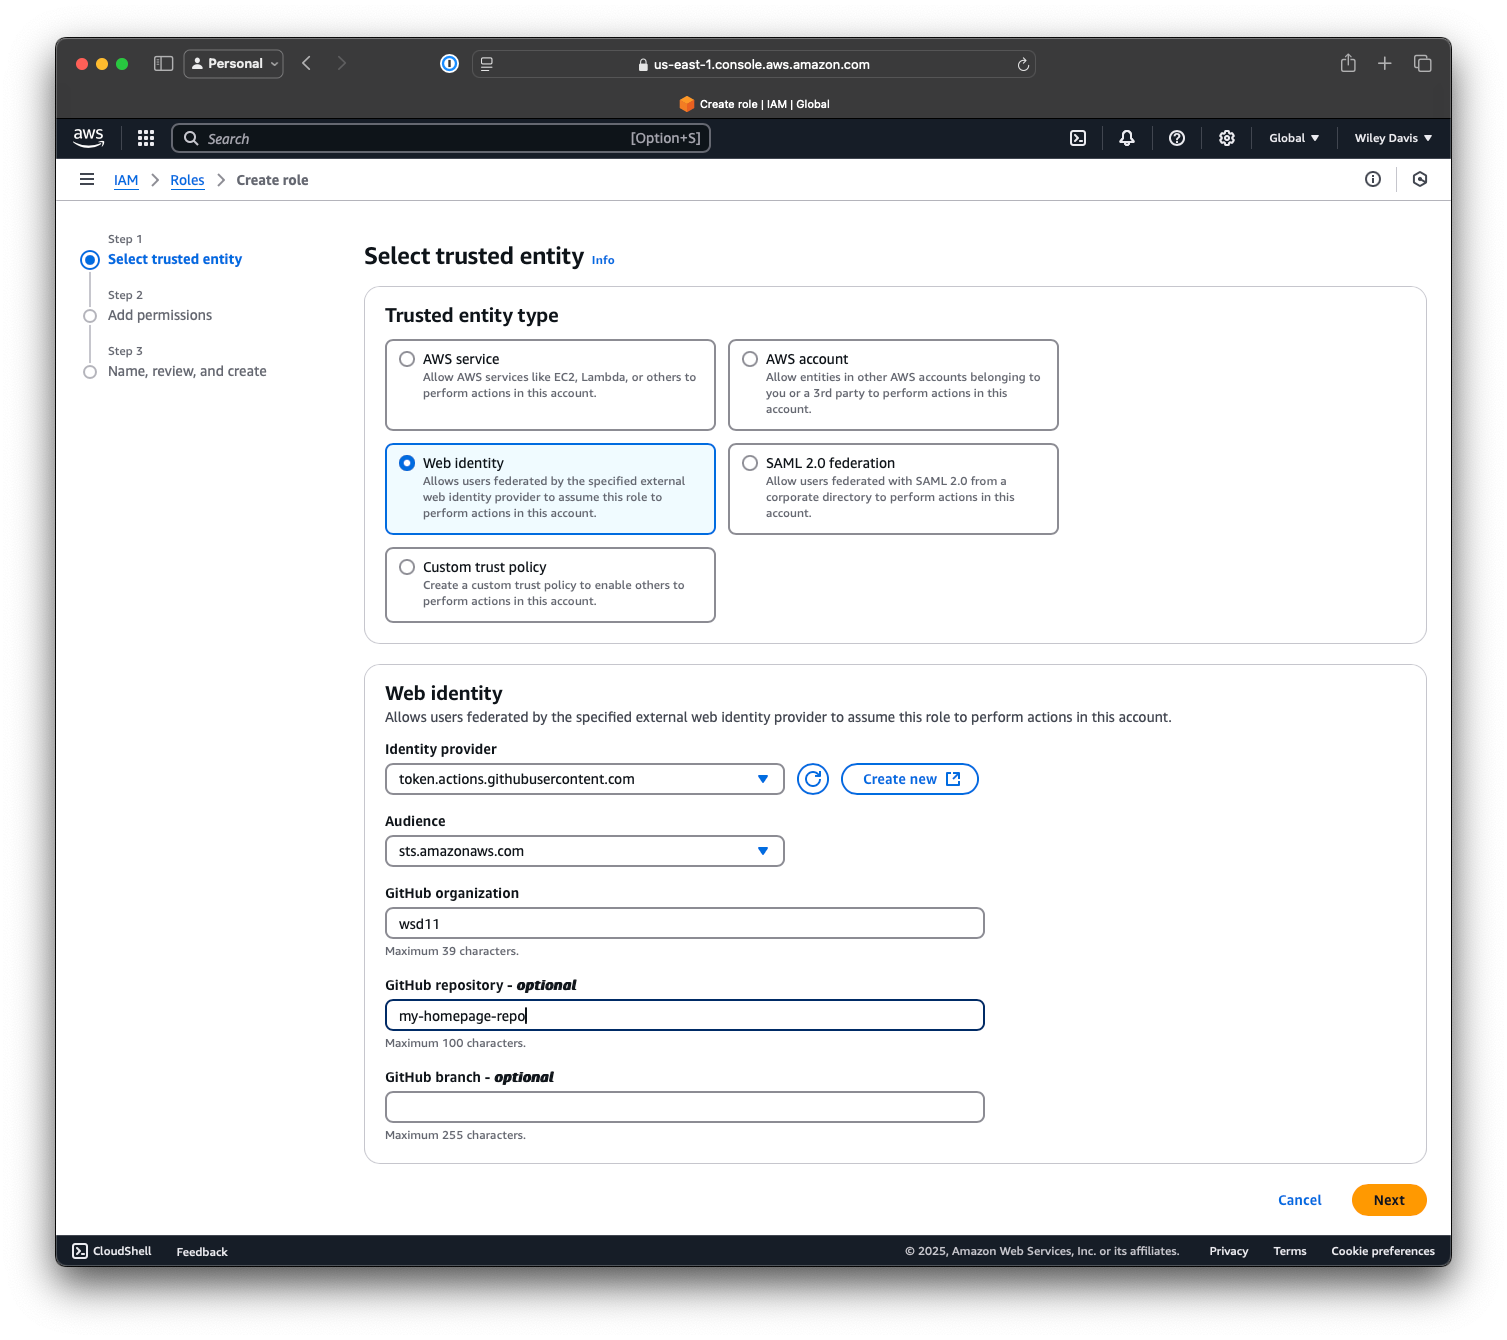
Once you select the GitHub OIDC service as your Identity provider, the page shows GitHub-specific options. If, like me, you're using this in your personal account, your GitHub organization is just your username. In other words, if the repo where you intend to use this role has the full GitHub URL https://github.com/wsd11/my-homepage-repo, the value for GitHub organization is wsd11 and the GitHub repository is my-homepage-repo.
When using the official action in GitHub, GitHub composes a sub (subject) line for its request based on the organization/account, repo, and branch. The configuration here tells AWS "If GitHub shows up with a request from within this organization, repo, and branch, let them do what they're asking to do".
Depending on your configuration or choices, you may want to be more or less permissive here - this felt like a good balance between simplicity of configuration and security. Whatever you do, don't leave these blank, or allow use in public or untrusted repos.
On the next page, I added the policy I created previously, then stepped through to create the role:
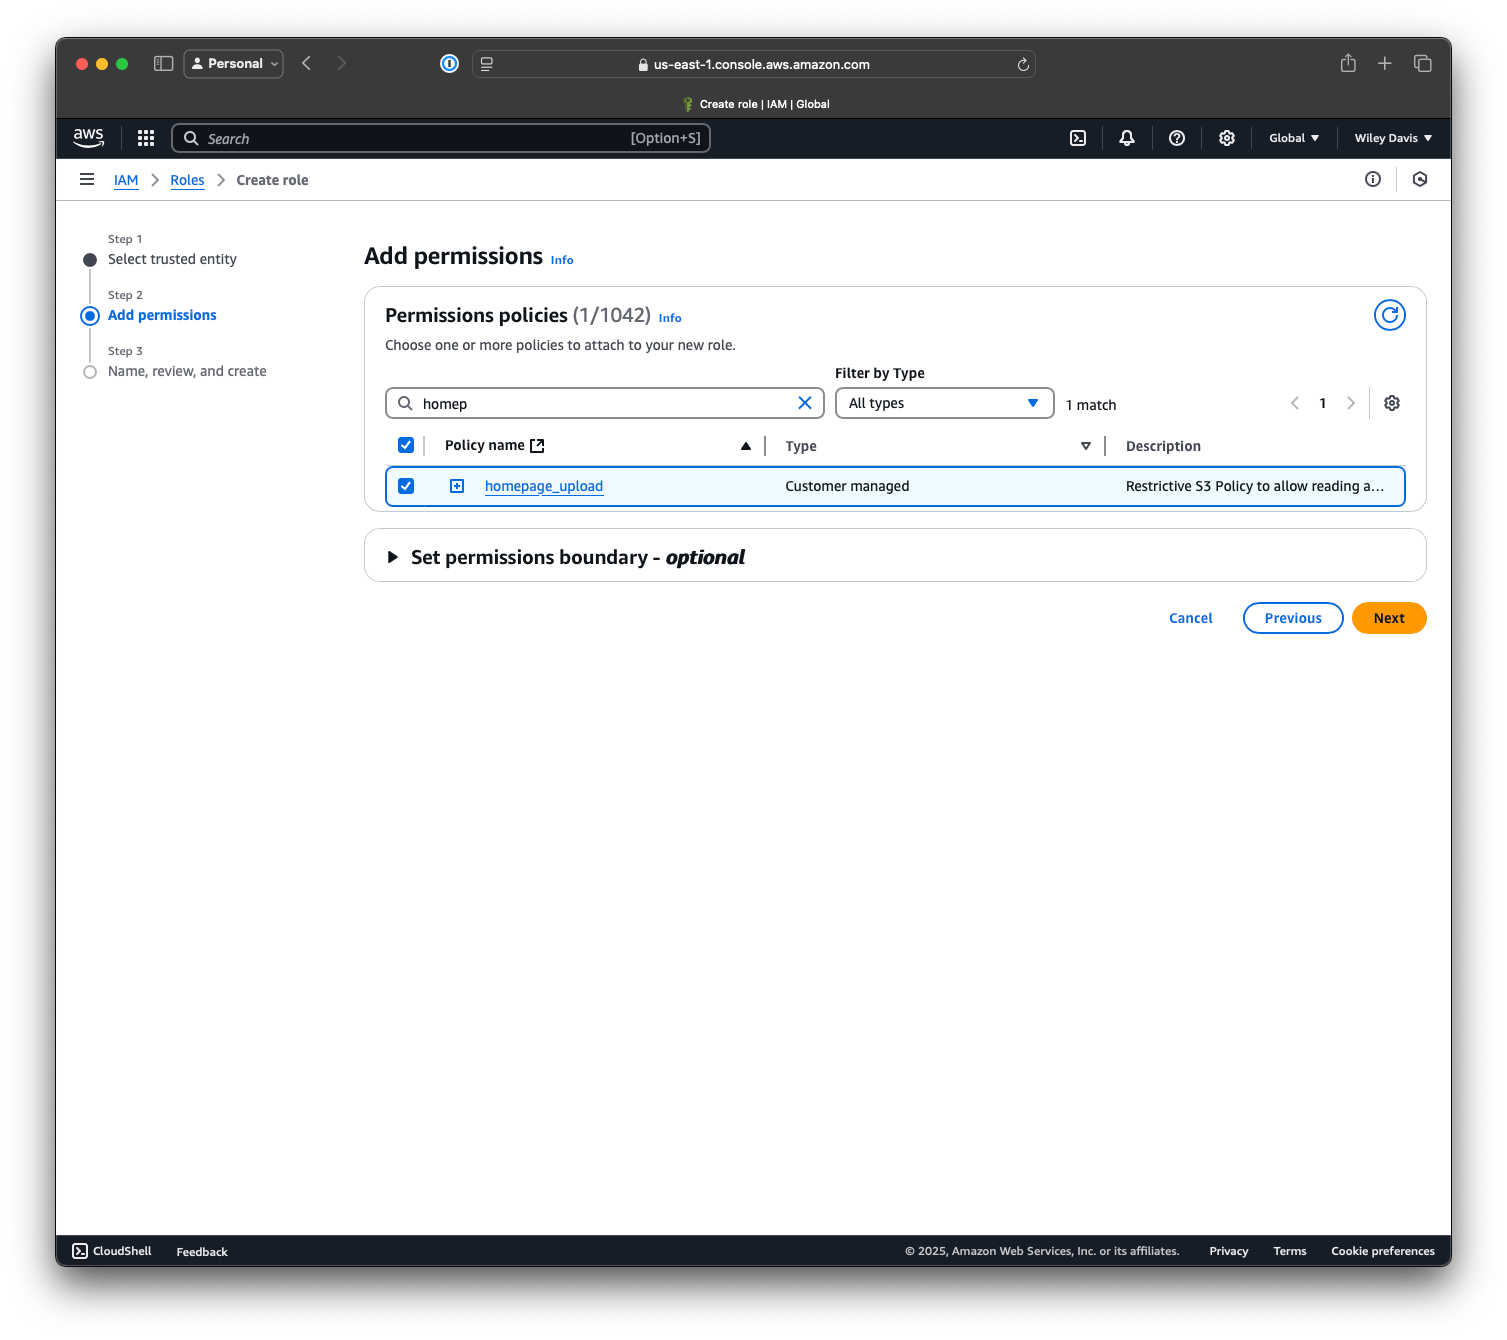
After creating the role, note its ARN and head to GitHub.
Building the action on GitHub
Setting up Repo variables
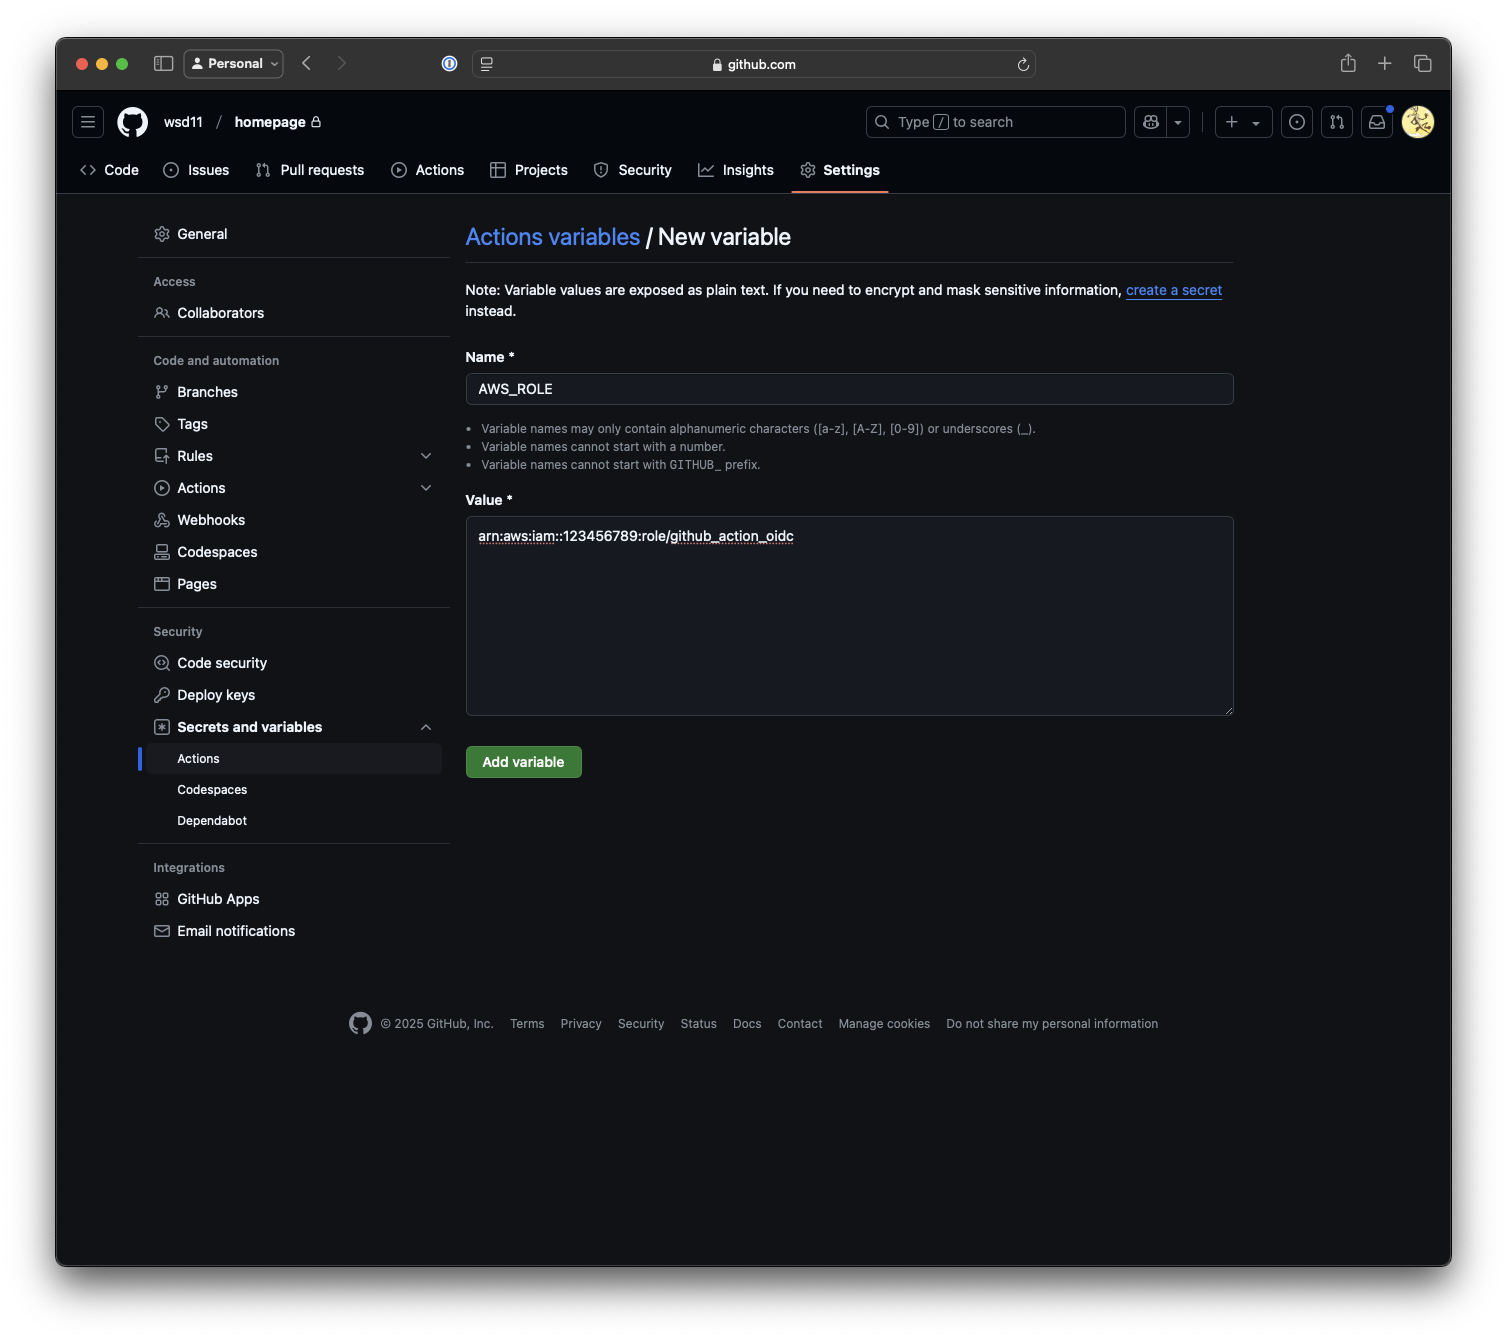
To make my action more versatile, I set up a few variables within the repo to hold things like the role ARN and S3 bucket information.
These are configured in the Settings tab of the repo under Secrets and variables -> Actions
I added a variable called AWS_ROLE, which holds the role ARN I created previously.
I also added one for the S3 bucket name using the same process.
Adding the action file
With the variables in place, I started writing the action. I tried a few different approaches, borrowing heavily from GitHub's standard Pages Static HTML action and this example from Samuel Olayinka.
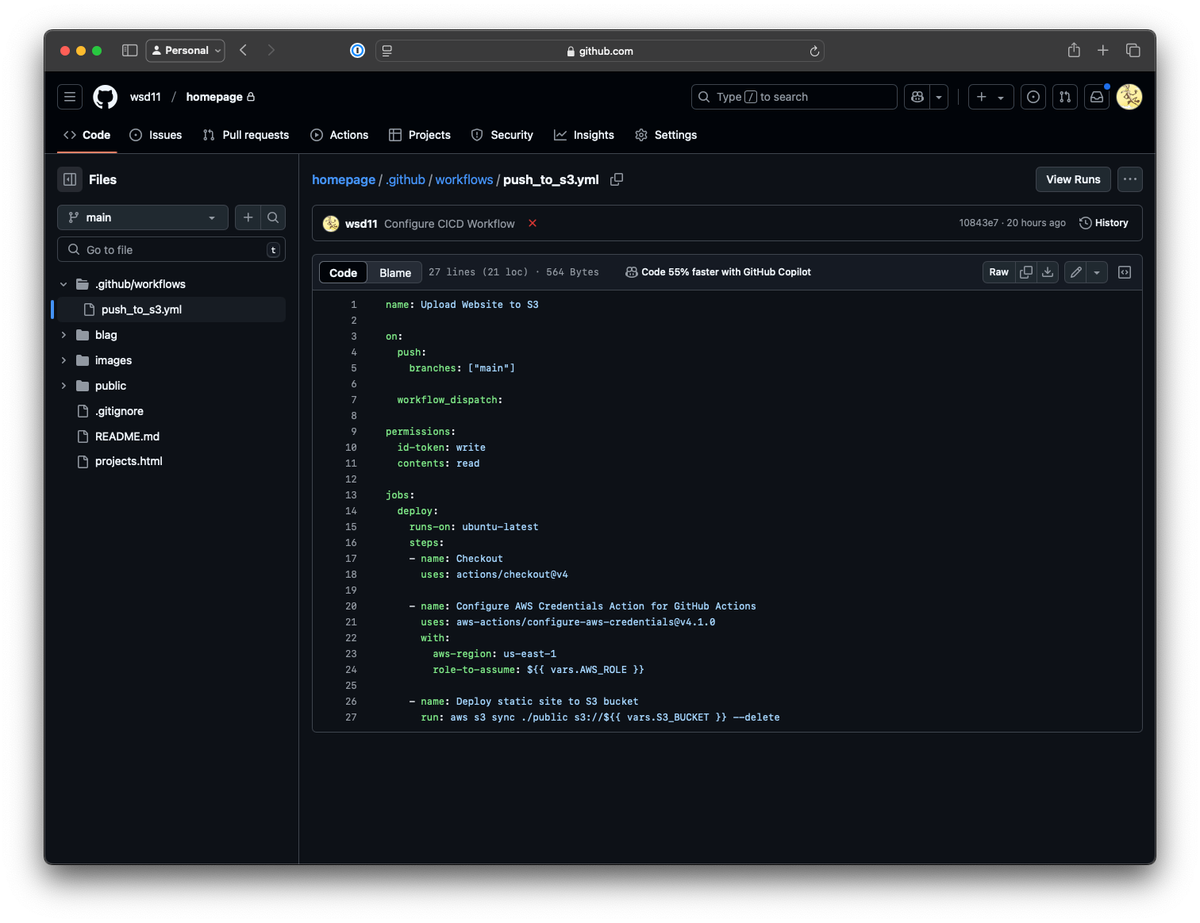
I used GitHub's Actions -> New workflow option, which automatically creates a file at .github/workflows/my-workflow.yml. If you're using my example code directly, you can skip directly to a blank file like this:

Configuring the action
After a few iterations, here's what I ended up with:
name: Upload Website to S3

on:
  push:
    branches: ["main"]

  workflow_dispatch:

permissions:
  id-token: write
  contents: read

jobs:
  deploy:
    runs-on: ubuntu-latest
    steps:
    - name: Checkout
      uses: actions/checkout@v4

    - name: Configure AWS Credentials Action for GitHub Actions
      uses: aws-actions/configure-aws-credentials@v4.1.0
      with:
        aws-region: us-east-1
        role-to-assume: ${{ vars.AWS_ROLE }}

    - name: Deploy static site to S3 bucket
      run: aws s3 sync ./public s3://${{ vars.S3_BUCKET }} --delete
Let's break down what's going on here.
The on section defines what triggers the workflow. In this case, it's on push to main. I also added the workflow_dispatch option, which allows me to manually trigger the workflow from the Actions page.
The permissions block allows the action to read and write the GitHub OIDC secret, granting access to AWS.
Under deploy, we finally get to interactions with files and AWS. checkout gets the current repo files and configure-aws-credentials invokes the GitHub OIDC connection.
There are a ton of options to configure, but for my simple use case, I just needed aws-region, which matches my S3 bucket region and role-to-assume, which tells the action to use OIDC using the role I created. I passed the role as a variable using GitHub's variable syntax here: ${{ vars.AWS_ROLE }}. vars allows access to repo variables - you could also use an environment variable within the workflow using env. or hardcode the value.
Finally, I've got the actual AWS CLI command.
aws s3 sync ./public s3://${{ vars.S3_BUCKET }} --delete
I'm using the sync folder mode to upload changed files in the ./public folder of my repo. This way, I'm not accidentally publishing my readme or GitHub workflows to S3. Again, I'm using a variable to set the destination S3 bucket. The --delete parameter tells sync to remove any files in S3 if they are not present in the repo.
Testing and next steps
After saving and commiting the workflow file, GitHub invoked the workflow and promptly failed. Since I hadn't yet created the ./public directory or added any files to it, the workflow stopped and sent a nice warning email.
I created a separate PR and commit to reorganize the files, allowing the AWS CLI to successfully sync them to the S3 bucket.
Now that I've got the workflow running, I've got a few more things planned.
- Improvements to the actual site (tracking, style refresh, fine-tuning)
- Automatic cache invalidation. Since CloudFront is caching the pages, updates take a long time to show up. I'm considering adding another AWS CLI action to invalidate the cache for any updated pages. Keep an eye out for a future post!